Batch creation of SKUs in Vendor Center
Step 1 : Export File
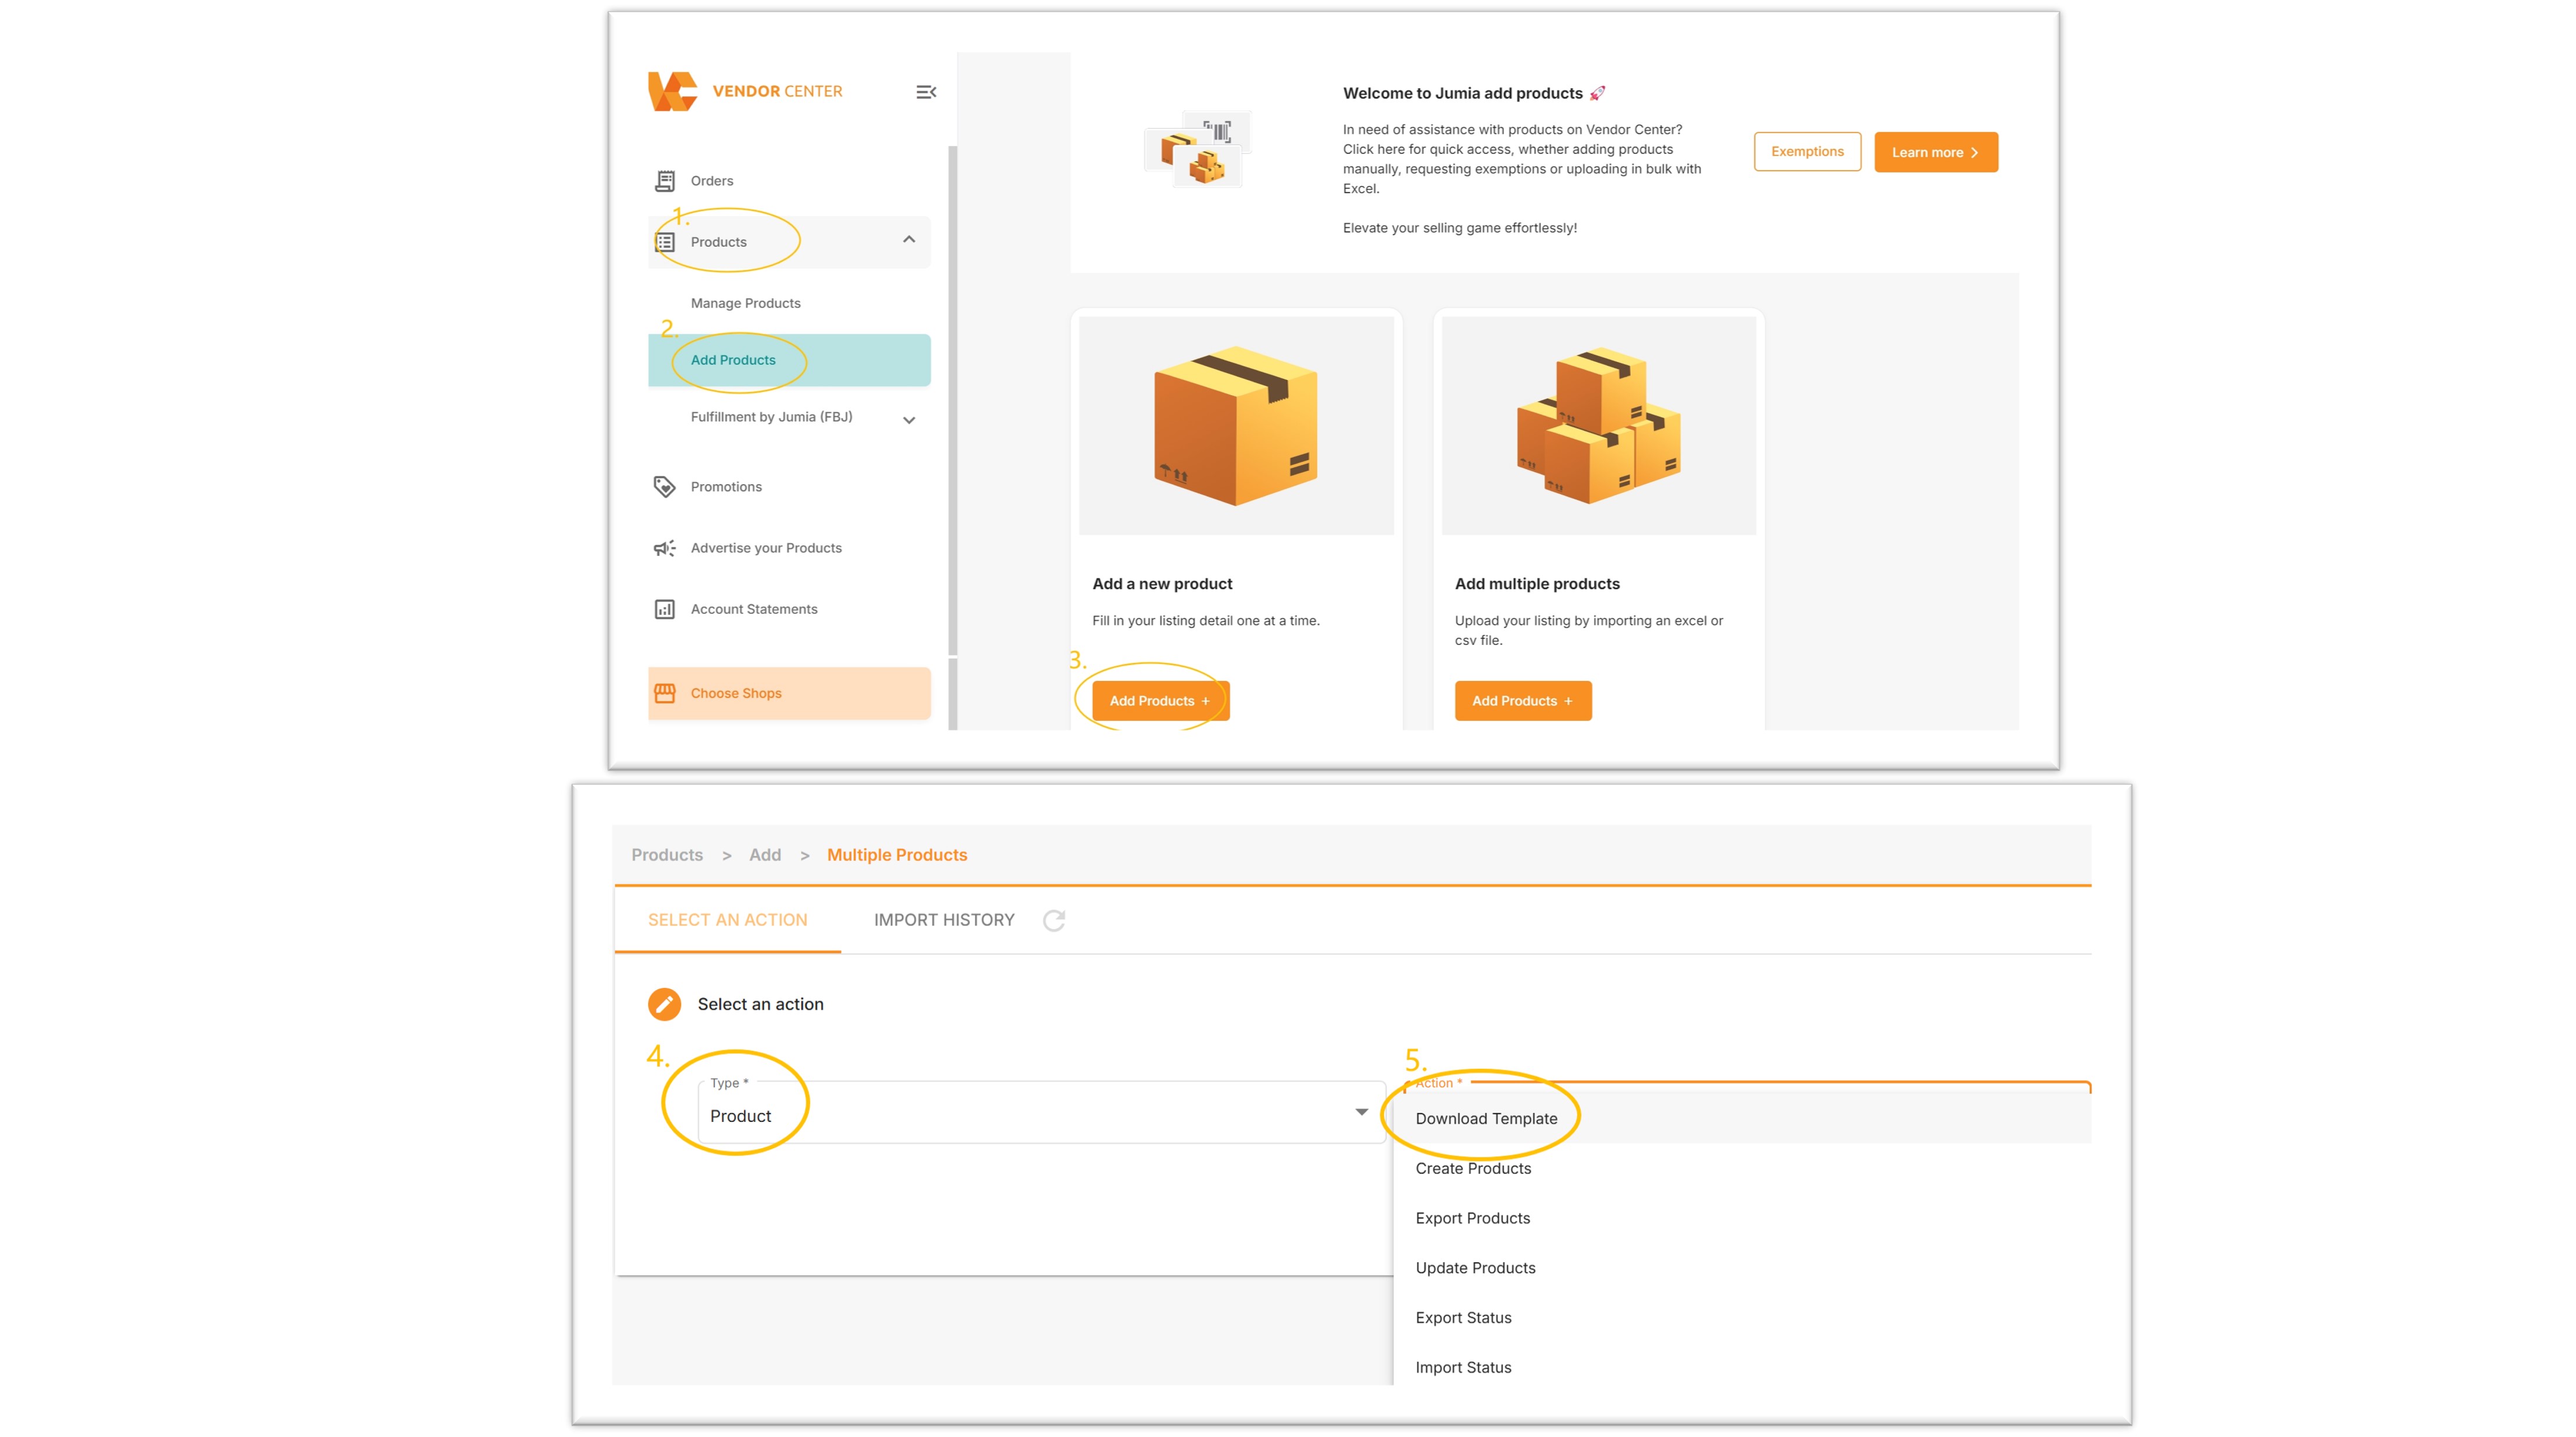
1.Path:
Products >>Add Products >>Add multiple products
2.Export file :
- On the left side, under Type, select "Product".
- On the right side, under Action, choose "Download Template".
- After clicking "NEXT", select "Shop".
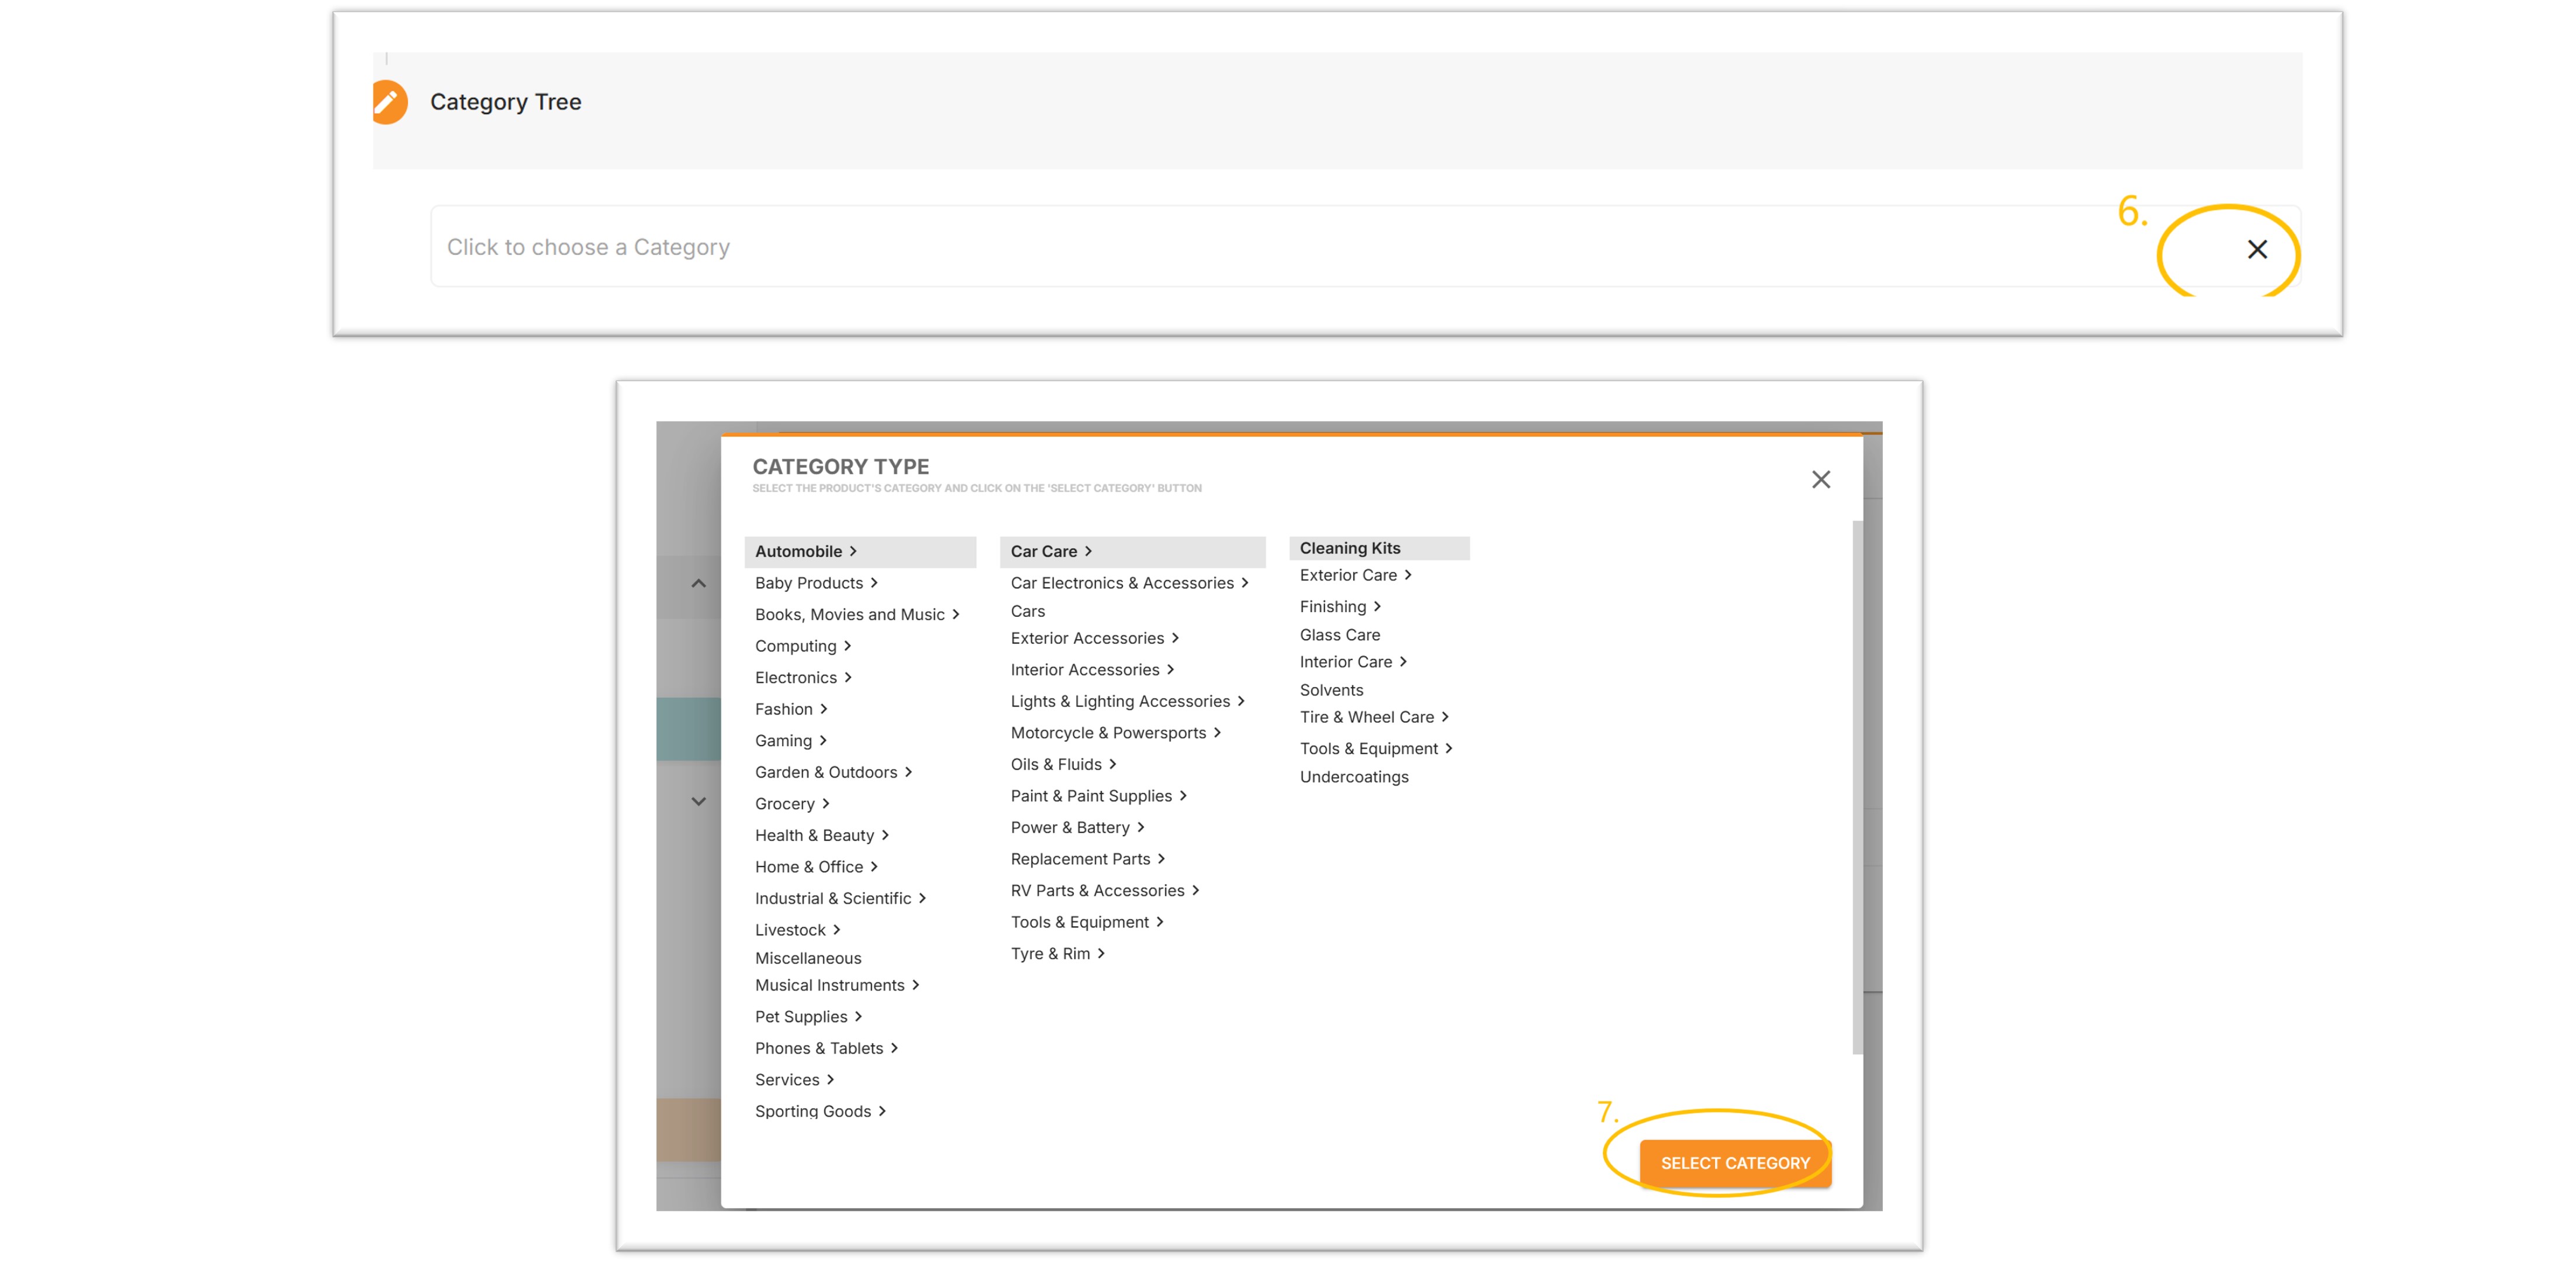
- Choose "Category" (click on the "X" symbol to display the categories, and ensure you accurately navigate to the lowest level of classification).
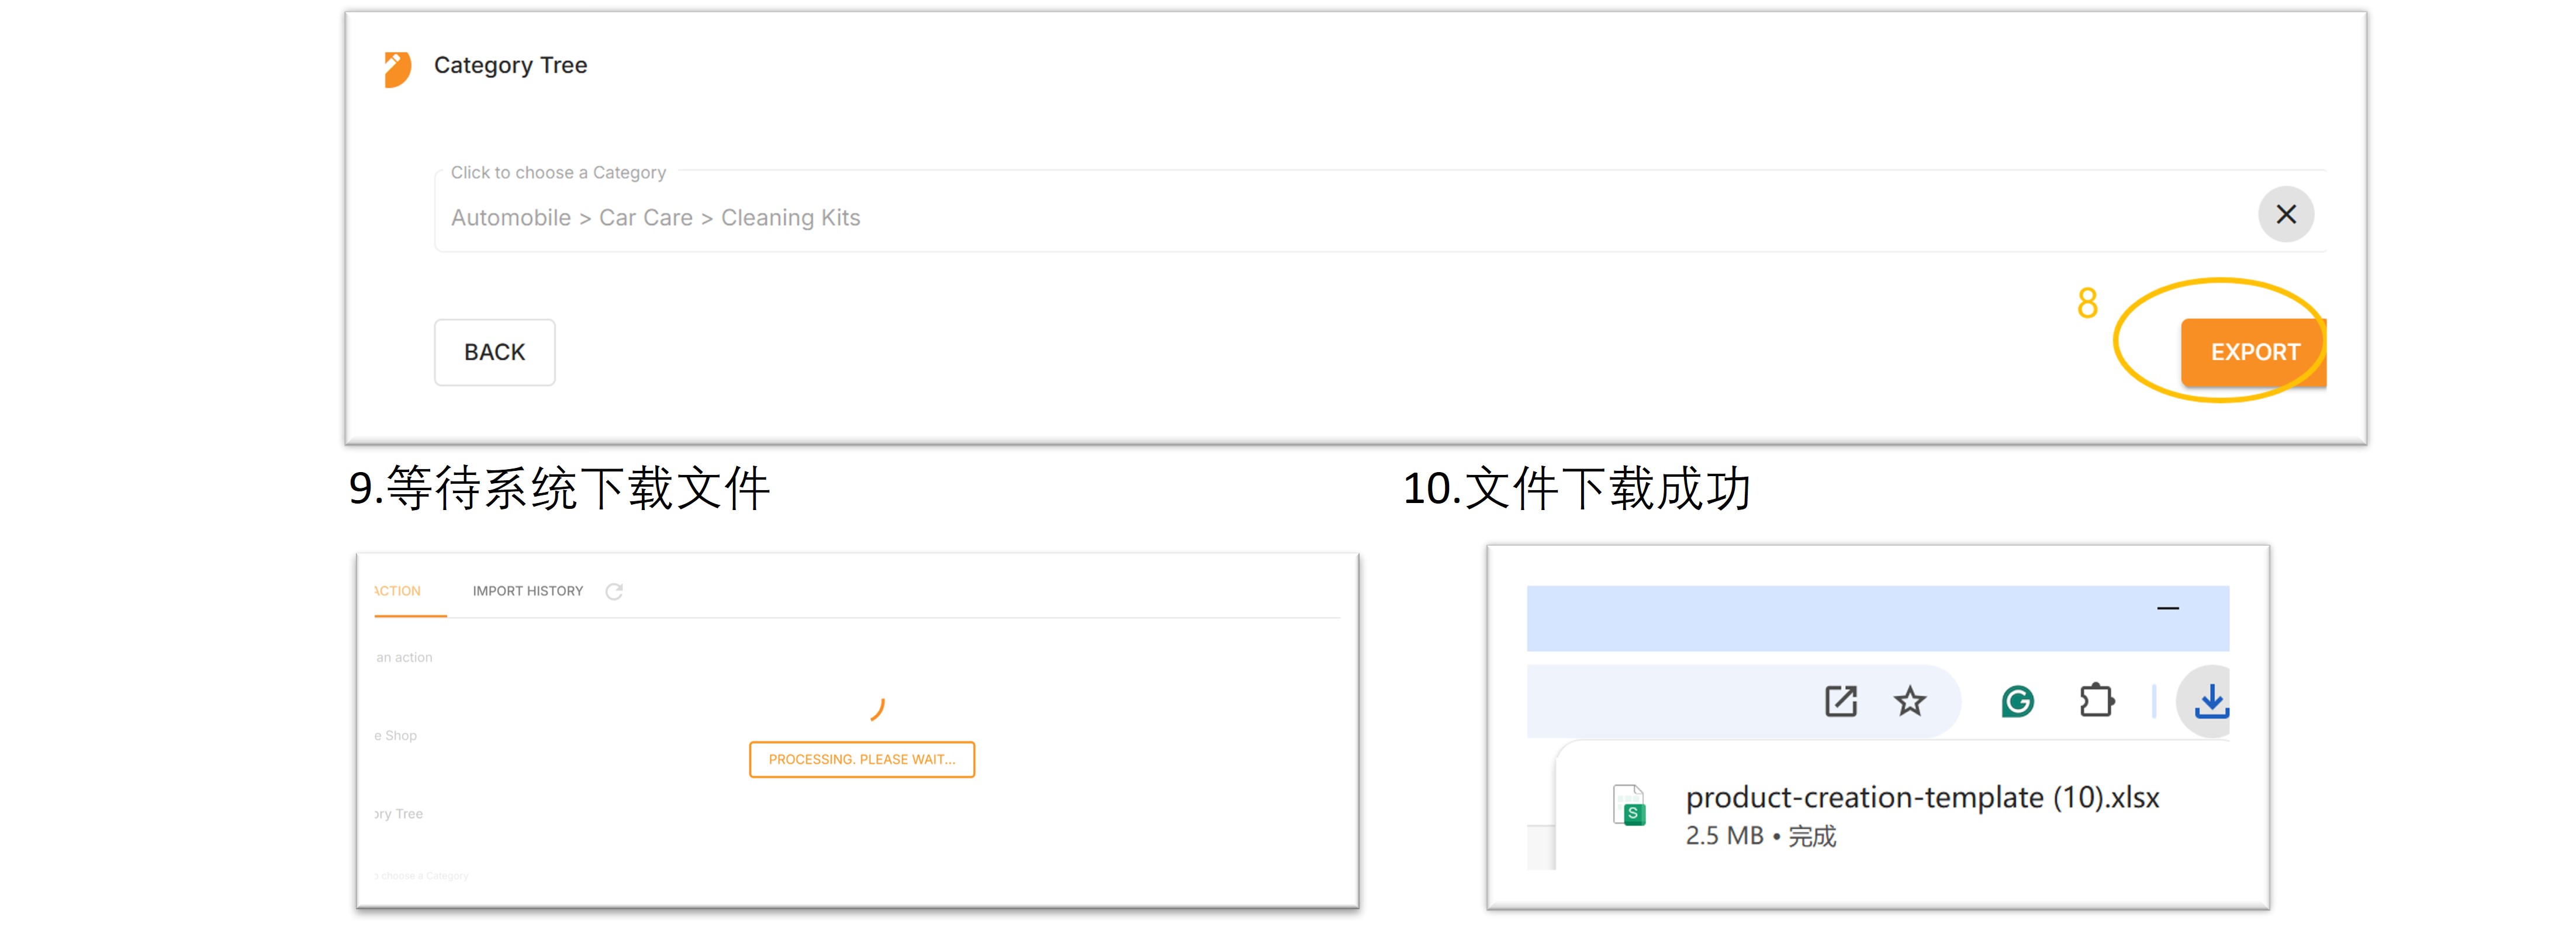
- Click "SELECT CATEGORY" and "EXPORT" to proceed.
Step 2:Fill out the file
- Do not modify the header row, otherwise the upload will fail.
- Please use the .xlsx format when uploading.
- You can create a maximum of 10,000 products at a time.
1.Form intruduction

- Upload Template Intruduction

Please click here for the "add a new product" template to view the relevant filling standards and precautions. Other important matters to note are as follows:
1)Name:
- The product name is a required field.
- Name_AR is for the product title in Arabic, and Name_FR is for the product title in French.
- Both are optional fields, but it is recommended that sellers fill them out. Doing so will display the product in the local language on the buyer's page in the corresponding countries, which enhances the buyer experience. If not filled in, the product will be displayed in English in all countries.

Warm reminder: When FBJ account listing products on the Côte d'Ivoire site's , please ensure that product titles are in French. If you use English titles for listing, the platform will provide translation services to translate them into French, with a charge of 1000 FCFA per SKU.
2)Description:
This is a required field.
- Description_AR is for the product description in Arabic, and Description_FR is for the product description in French.
- Both are optional fields, but it is recommended that sellers fill them out. This will display the product in the local language on the buyer's page in the corresponding countries, which enhances the buyer experience.
- Product descriptions should provide consumers with useful information about the product. Please ensure that the descriptions are clear and accurate, and that the content supports HTML code formatting.

3)Seller SKU and Parent SKU: Both are required fields. If a product has multiple variants, the Parent SKU names for the variants must be consistent, and the Seller SKU names must not be duplicated. Example: A blue shirt with different sizes should be filled out as follows (Jumia does not allow color as a variant; if there are shirts in other colors, a separate product must be created for that color).
For example, if you have a blue shirt available in different sizes, you should fill in the information as follows (Jumia does not consider color as a variant, so if you have shirts in other colors, you need to create separate products for each color):
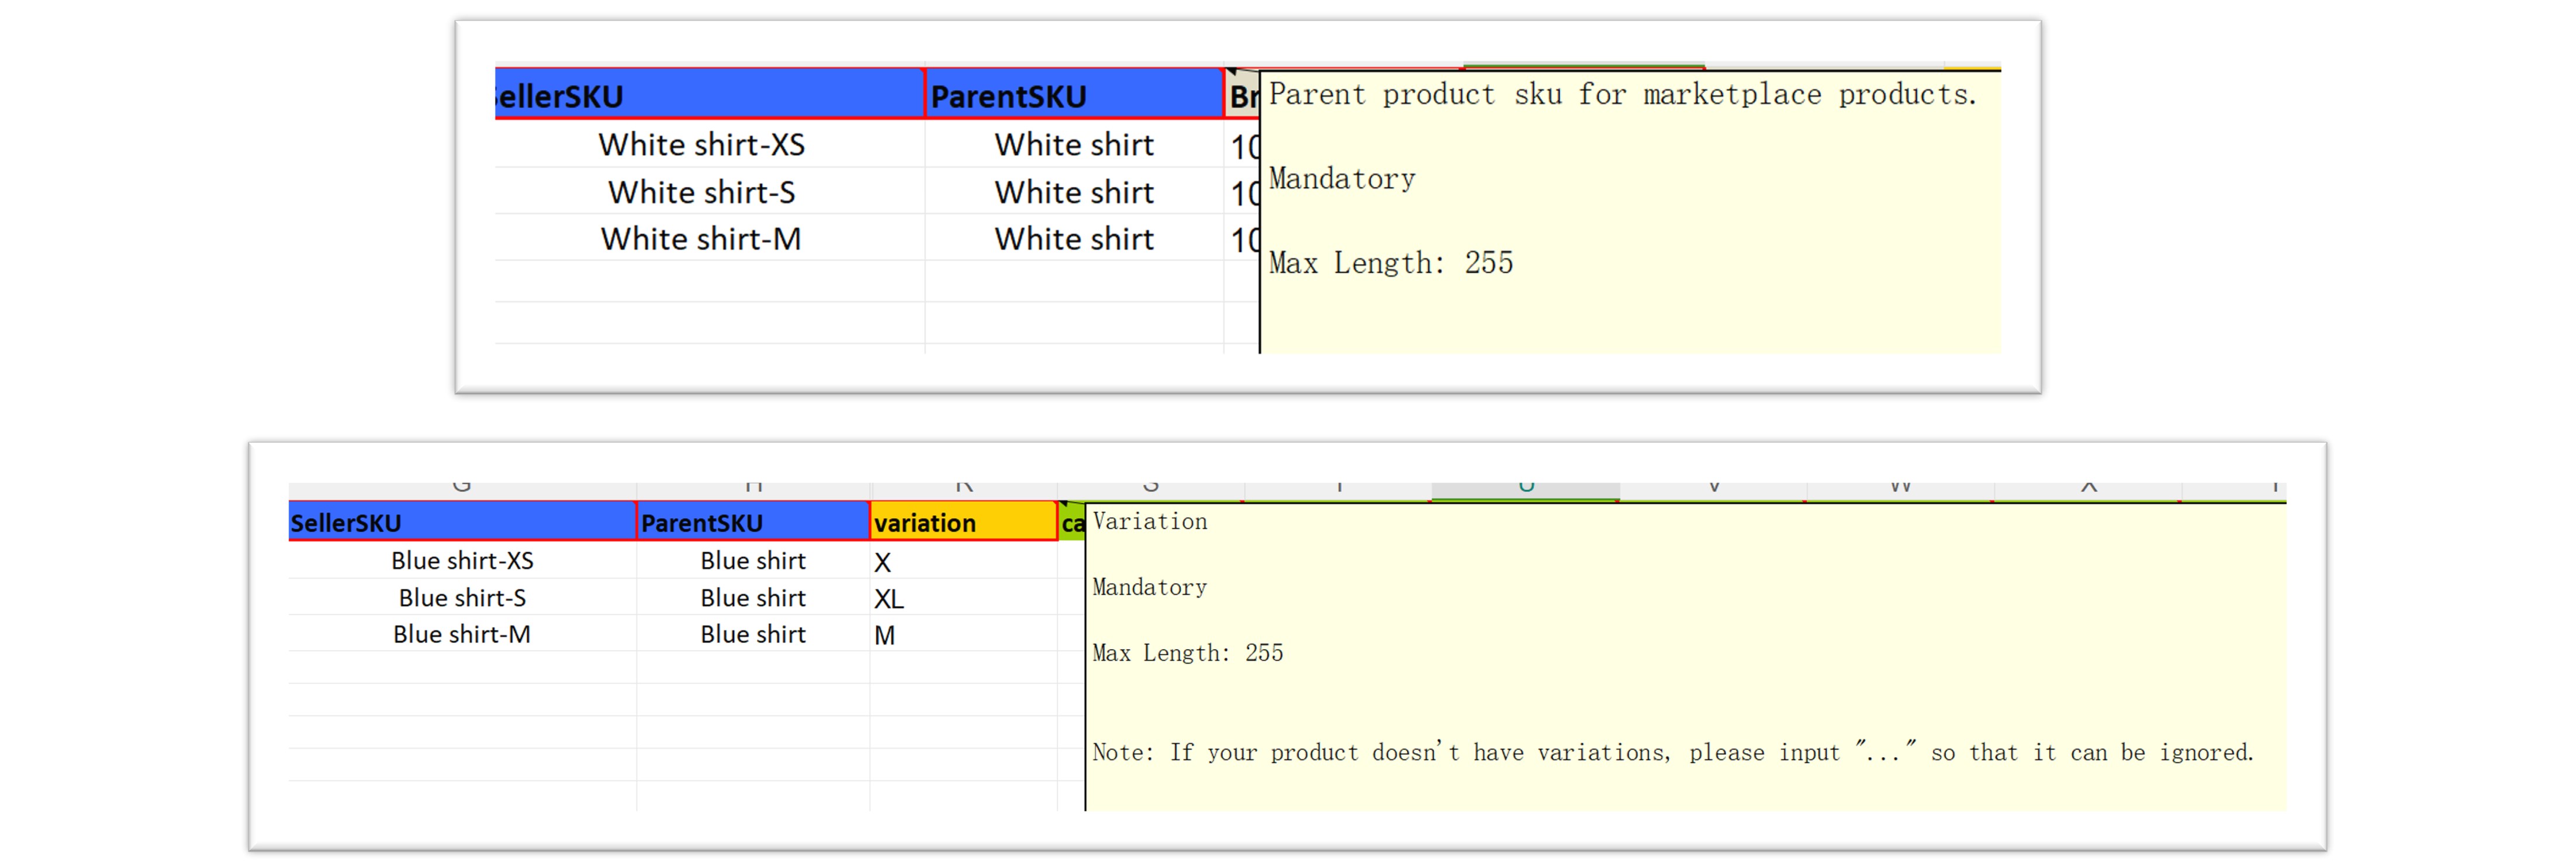
If a product does not have any variants, you can copy the Seller SKU into the Parent SKU field, fill it with "..." to indicate that there are no variations.
Sample:

When filling out product details, avoid using color-related terms such as "white surface with a black base" to reduce the risk of the system interpreting color as a variant.
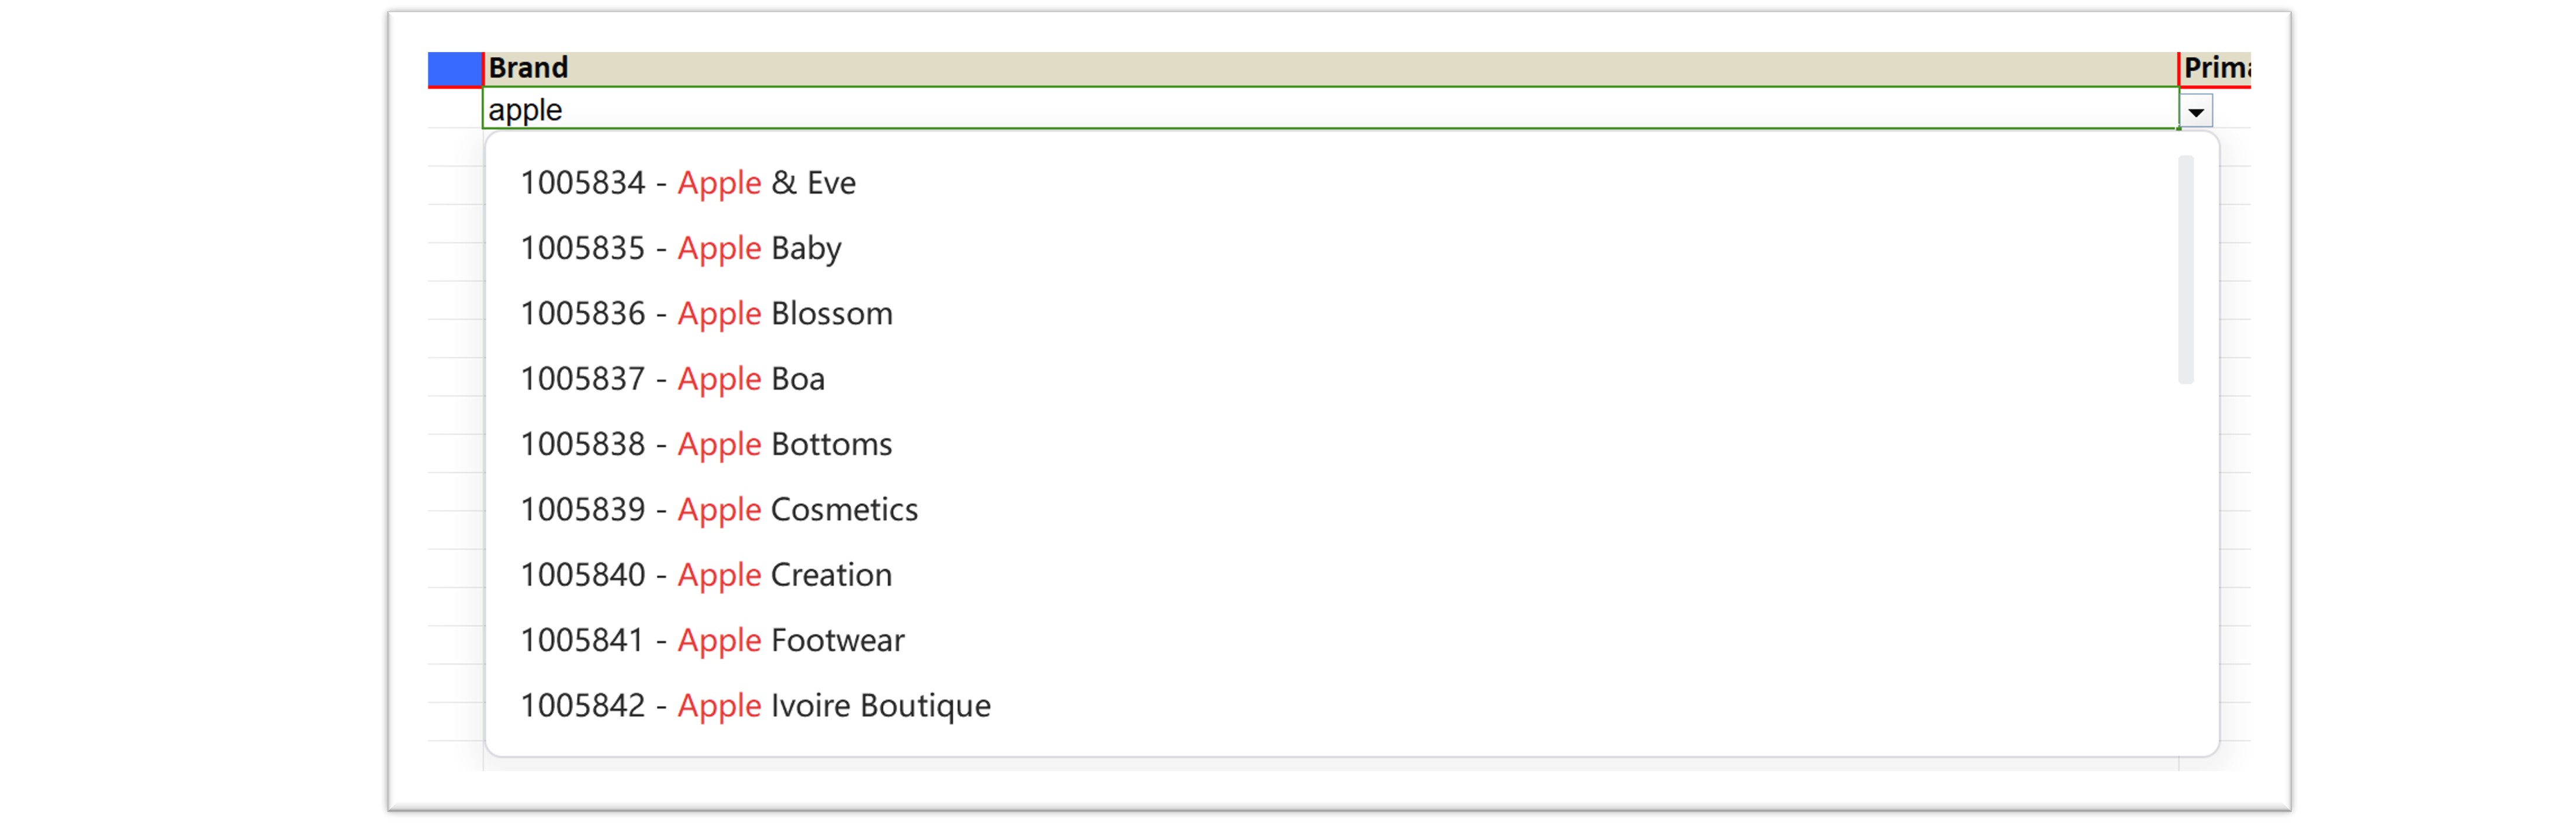
4)Brand:Brand is a required field, and you can view all available brands in the Brands worksheet.
To sell products under a specific brand, please type the desired brand name into the box and select it from the dropdown menu.
For selling unbranded products:
- For fashion items, enter "1039426-Fashion".
- For all other categories, you can uniformly enter "1045133-Generic".

Please click here to check more details about Brand
a. When applying for a Jumia merchant account, if you register a store name as XXXOfficial store (official store) on the application form, the document review staff will proactively contact you via email to provide the corresponding brand authorization letter to register the brand store. Once the store is successfully registered, the store name cannot be changed.
b.If the brand is already present in the system but is 'Restricted',In this case, sellers need to submit the corresponding brand authorization documents through here to RAC, such as brand registration certificates, official authorization letters, and other relevant materials.

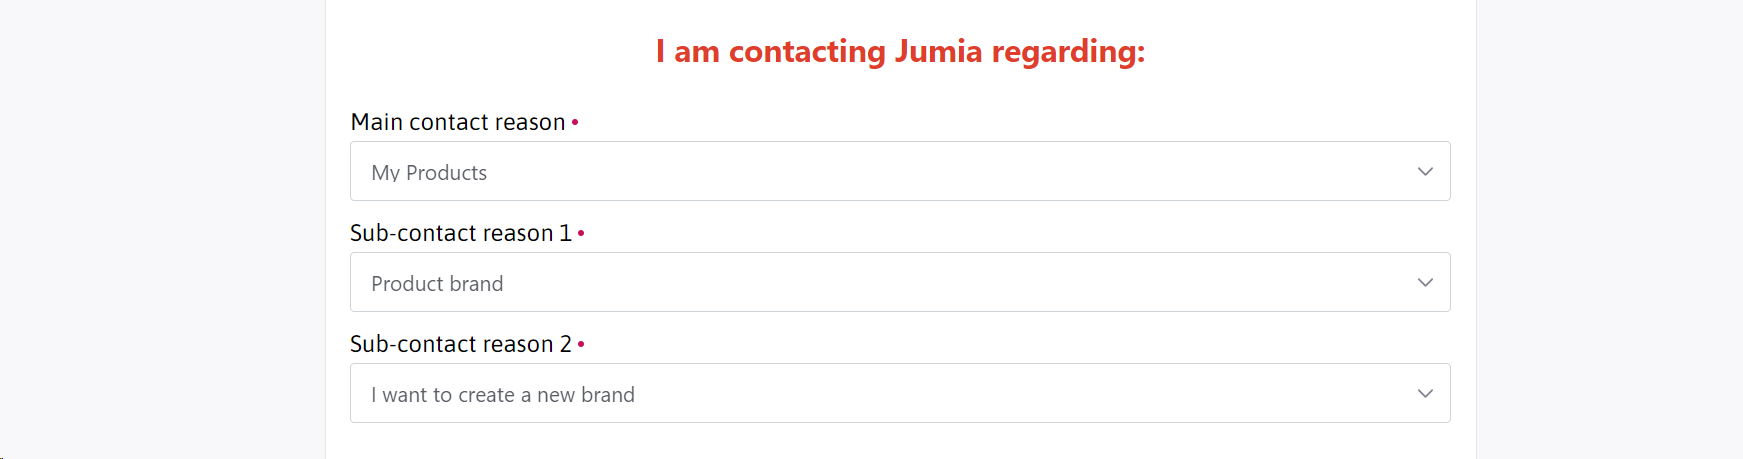
c. If the brand does not yet exist in Vendor center, and you need to create a new brand, please click here to apply (ensure to select the appropriate category below) and provide the corresponding documentation.
5)Primary Category: Please select the product's main category from the dropdown menu. The options available should match the category chosen when downloading the template.

6)Price_USD: The original price of the product in USD, this is a required field.
Sale_Price_USD: The promotional price of the product in USD, this is an optional field. The discount price must not exceed 50%.
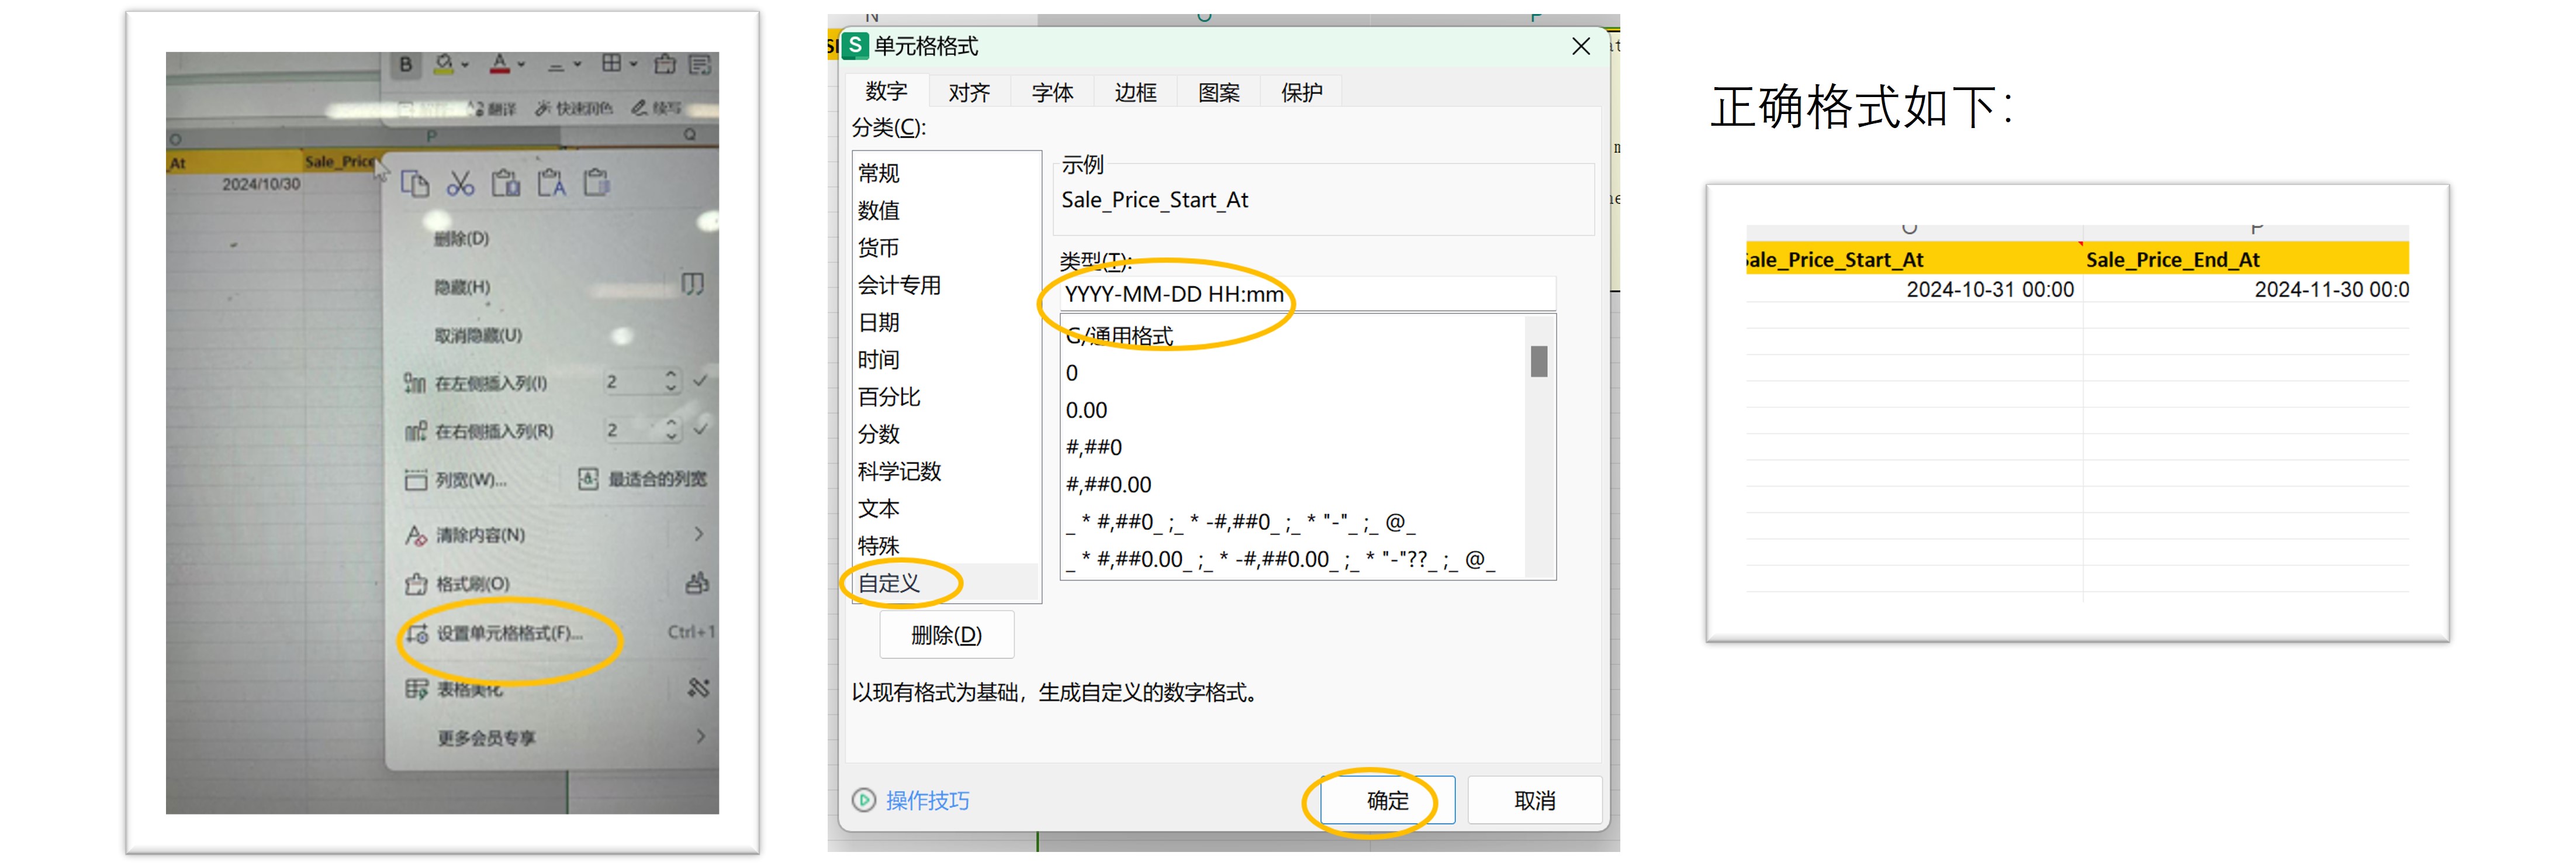
Sale Start Date & Sale End Date: The start and end dates for the promotion. If a promotional price is provided, these two dates are required fields.
These prices, calculated in USD, will automatically be converted to the local currency of each site according to the exchange rate.

Note! The date format should be: YYYY-MM-DD HH:mm. Here are the specific steps:
- Stock: Stock is a required field, and the inventory is shared across all sites. Orders from any site will reduce this inventory. The stock will only be visible after passing the quality inspection. If a product has no stock, it will not be visible on the front end. *For overseas warehouse stores (COD) uploading products, please enter a stock quantity of 0. This is because the SKU quantity is based on the actual inventory in Jumia's overseas warehouse. After uploading the product, do not change the stock quantity directly. If you find any errors in the data, please raise a claim in a timely manner.
- product_weight: Weight is a required field and should be in kilograms (KG). If a product weighs 250 grams, you should enter 0.25 here. The product weight entered by the seller is for consumer reference only. The actual international shipping fee calculation weight will be based on the measurement information at the corresponding sorting warehouse.
- Short-description: This is a required field, where AR stands for Arabic and FR stands for French. It is recommended to use HTML code format for the content. Key annotations should be presented in a bullet-point format, with a minimum of 4 points. For 3C electronic products, the key annotations should include at least 7 points, including but not limited to the operating system (OS-Operation System), camera (Came), display, memory (Memory), processor (Processor), battery capacity (Battery), and product color (Colour).

- Image: Product images are a required field, and you can upload up to 8 images. The main image should display the front of the product. The image pixel requirement is between 500x500 and 2000x2000, and the maximum image size should not exceed 2MB. The content to be filled in should be in the format of a URL.
如何上传格式为URL的图片?
How to upload images in URL format?
- Log in to a reputable image hosting service.
- Upload your image to the service.
- After the image is uploaded, select the option to convert the image to "URL" format.
- Copy the URL link provided.
- Paste the URL link into the table where the image URL is required.
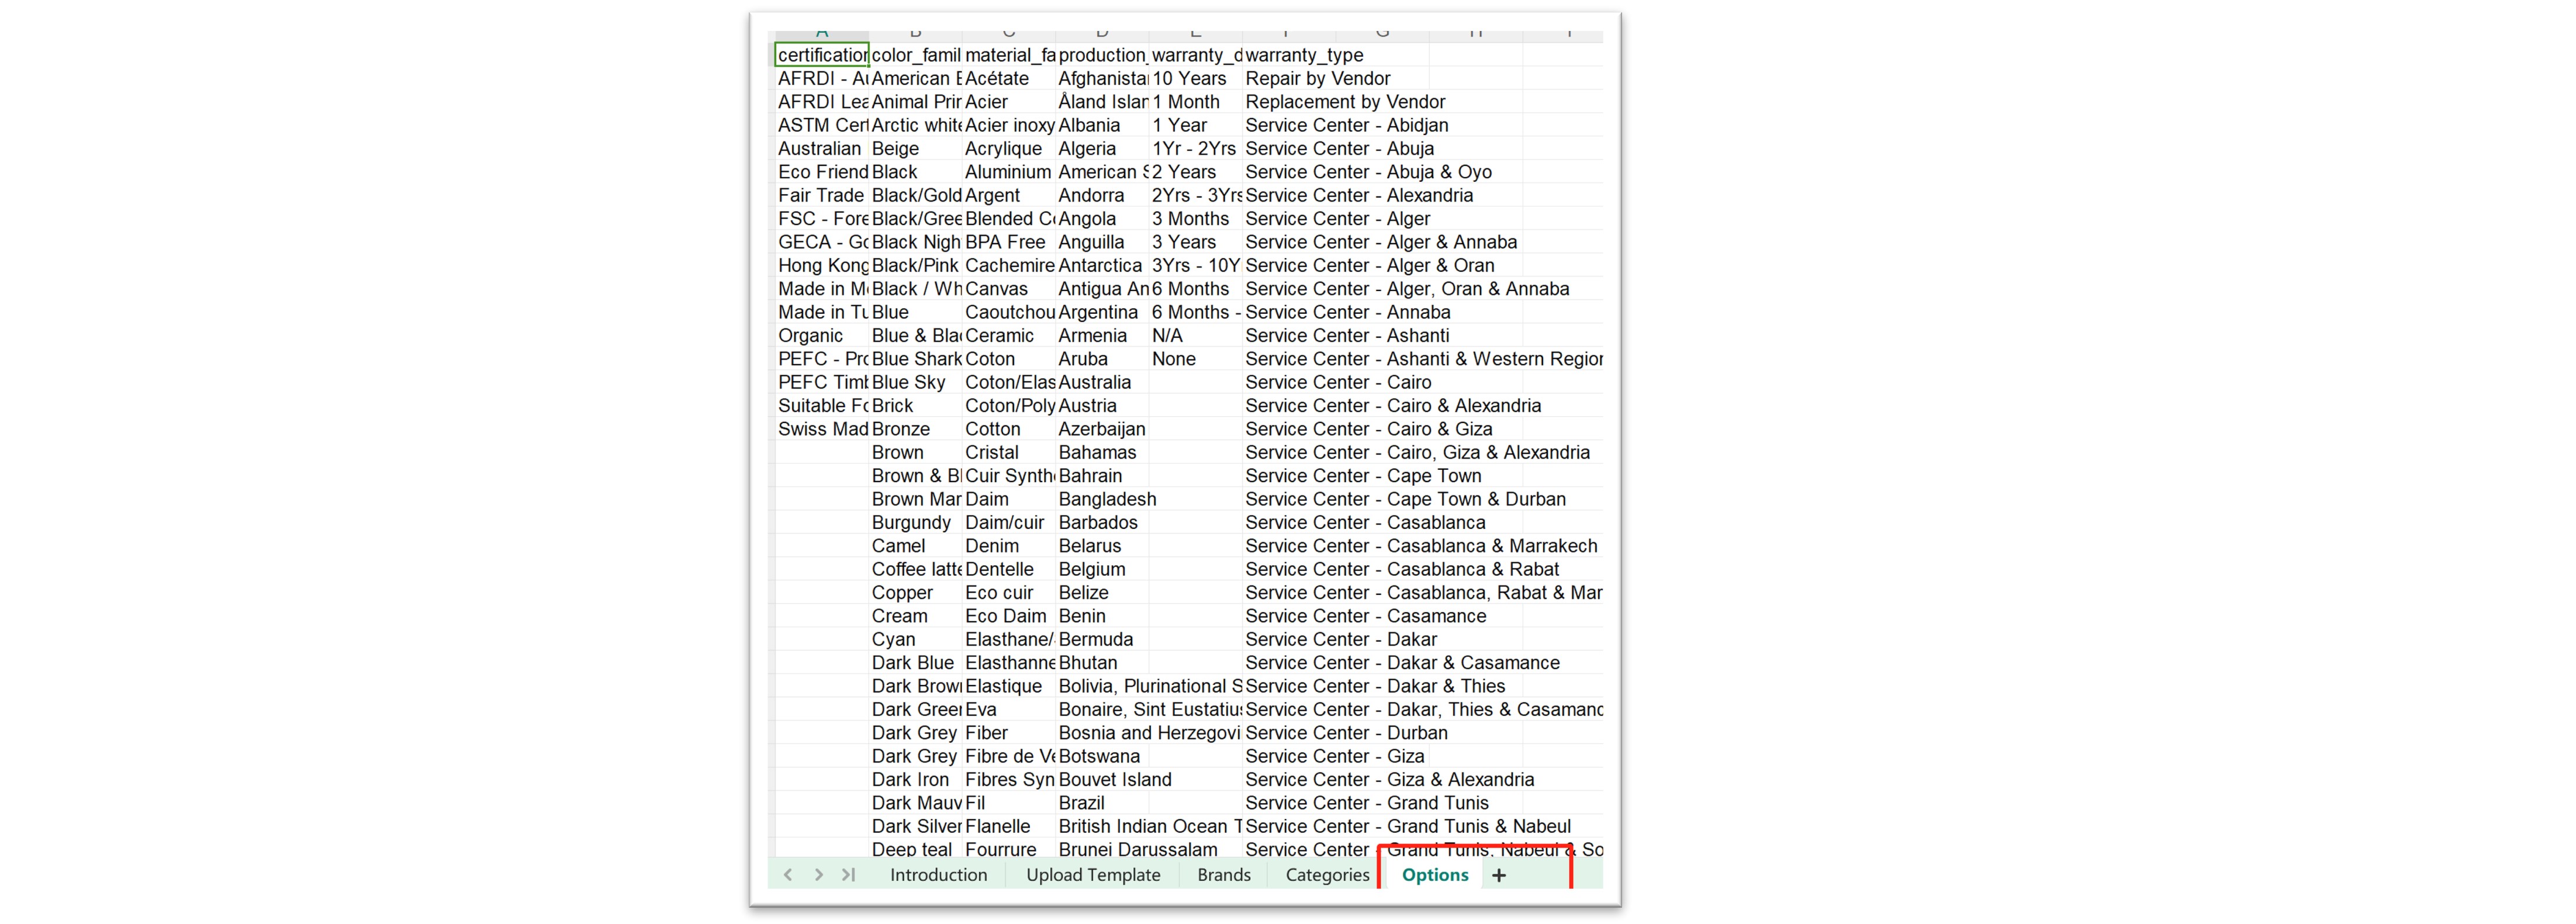
11)Other information such as Shop Type, Color Family, and Material Family can be found in the "Options" table where you can select from existing variables using the drop-down menu. For other content, please refer to here for information on filling standards and notes to be aware of.
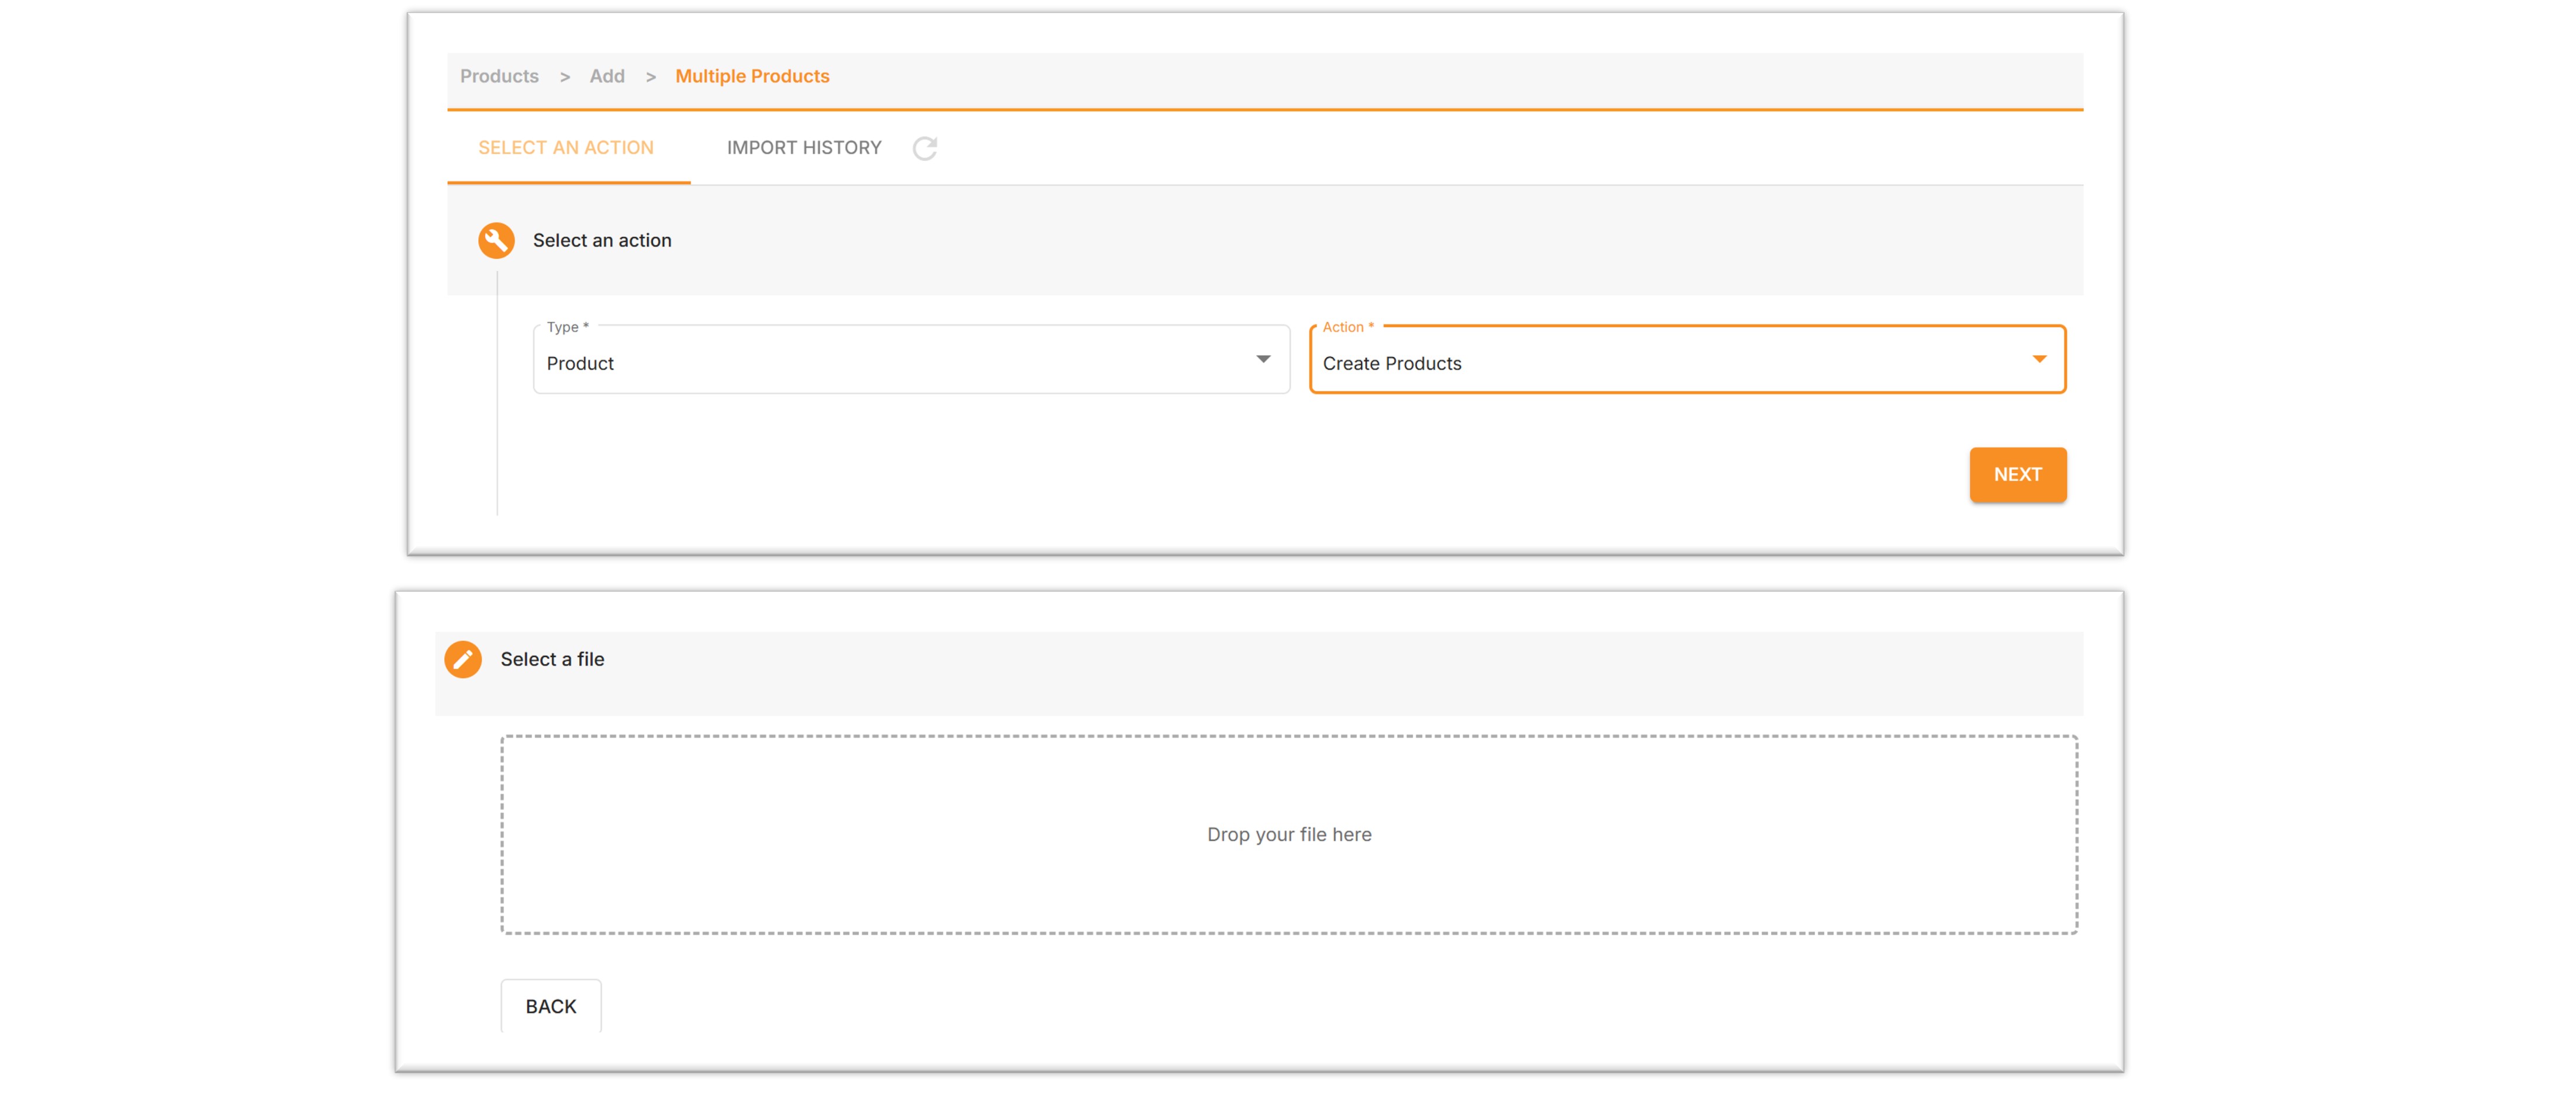
Step 3:Upload File
- Import the edited spreadsheet, select "Product" for Type, and "Create Products" for Action.
- Choose the store and drag the edited spreadsheet here to upload.
Step 4:Check imprort history
The upload status can be categorized into the following 5 types:
- Pending: Waiting to be uploaded.
- Completed: Finished.
- In progress: Uploading.
- Failed: The upload has failed. Please download the error report to check the reason.
- Partially Failed: Some items did not upload successfully. Click on the progress bar to view the success percentage.
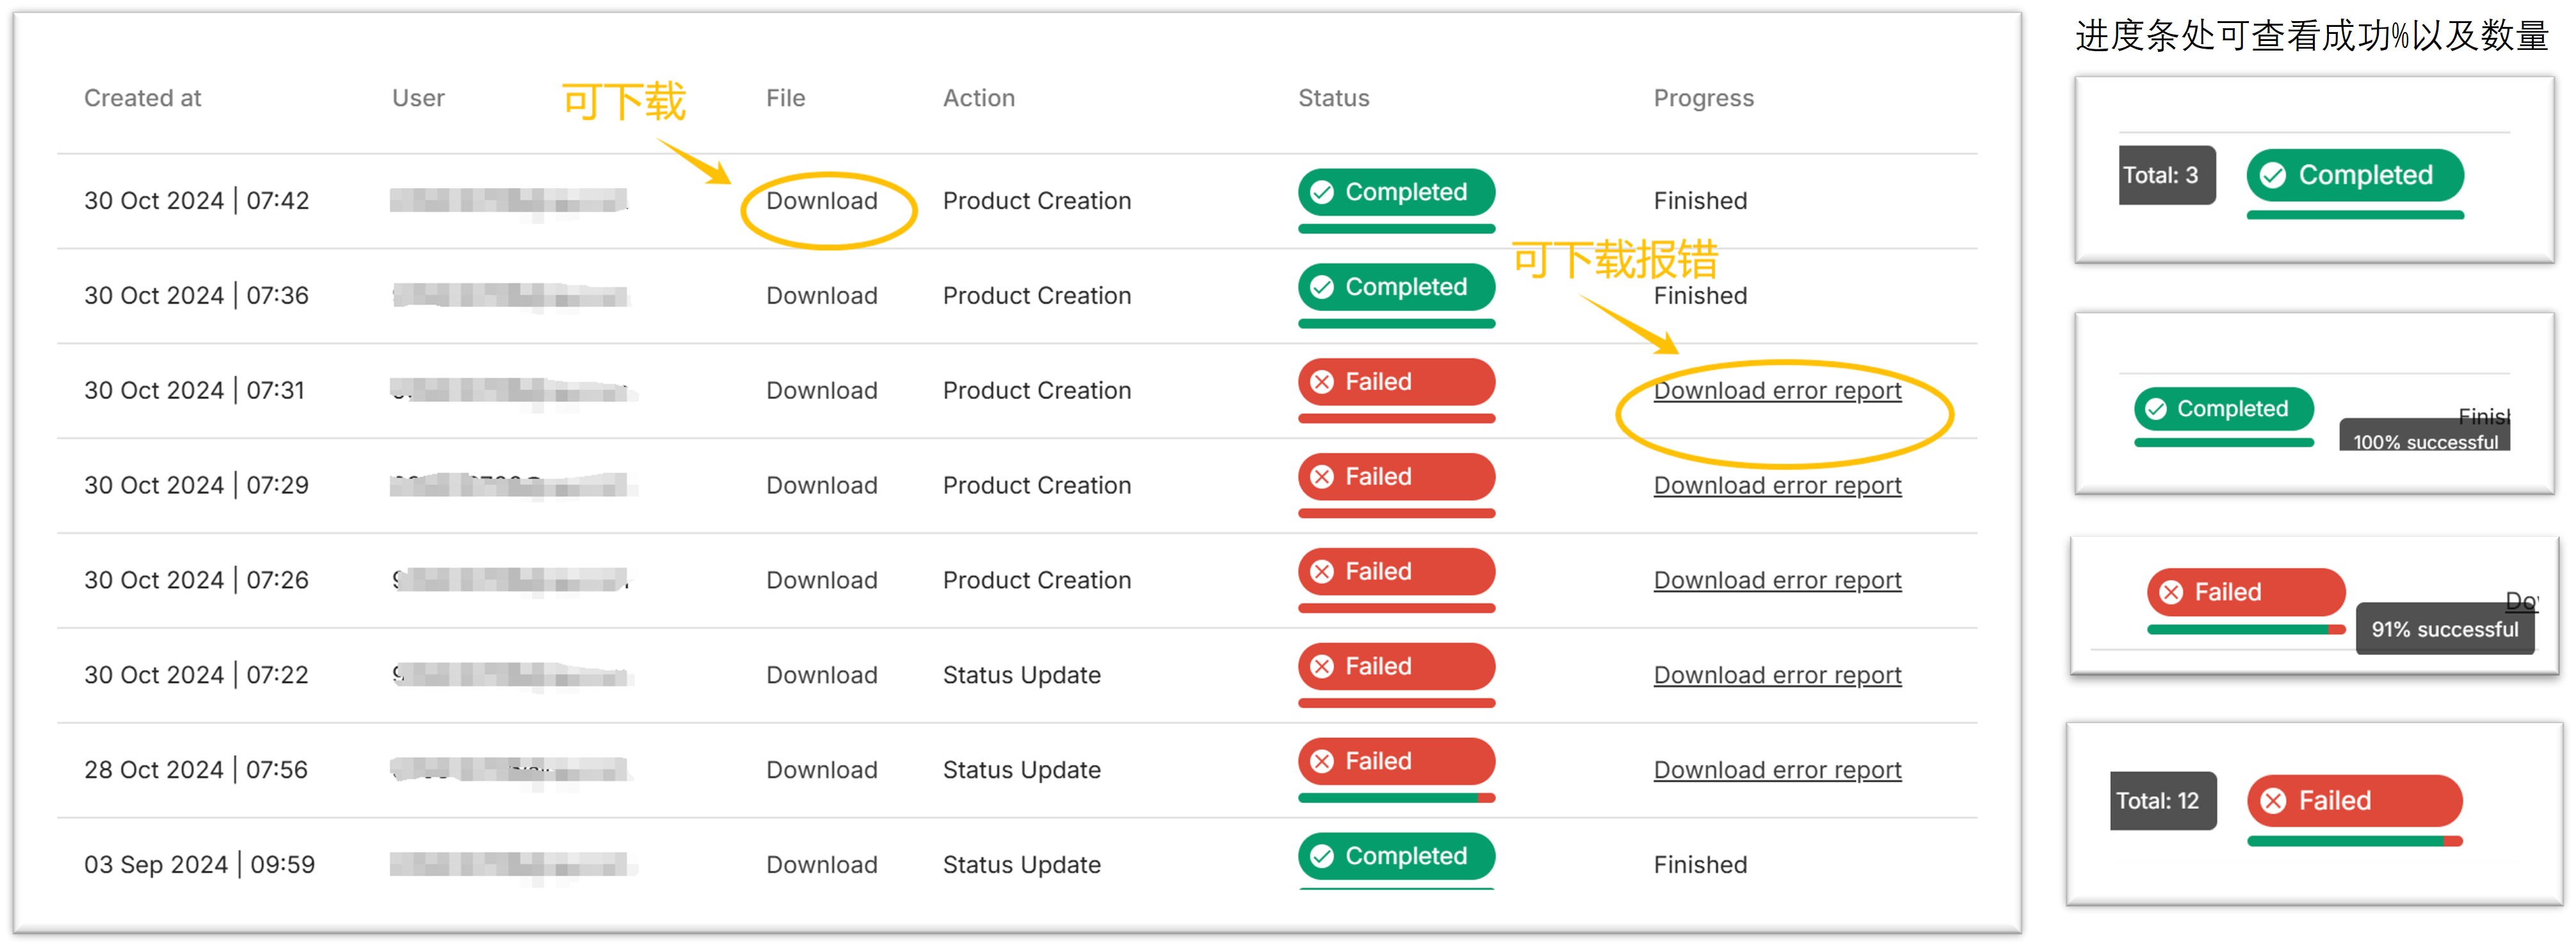
Upload History Page Breakdown:
- Created at: The time when the upload was created.
- User: The person who initiated the upload.
- File: The uploaded file that can be downloaded.
- Action: The category of action performed.
- Status: The current status of the upload; clicking on the status will show the completion progress percentage.
- Progress: Indicates whether the upload is "Finished" or provides an option to download an error report if there are issues.
After successful product creation, the products will enter the product review process.
For more details, you can click here to view the specific content.
Step 1 : Export File
1.Path:
Products >>Add Products >>Add multiple products
2.Export file :
- On the left side, under Type, select "Product".
- On the right side, under Action, choose "Download Template".
- After clicking "NEXT", select "Shop".
- Choose "Category" (click on the "X" symbol to display the categories, and ensure you accurately navigate to the lowest level of classification).
- Click "SELECT CATEGORY" and "EXPORT" to proceed.
Step 2:Fill out the file
- Do not modify the header row, otherwise the upload will fail.
- Please use the .xlsx format when uploading.
- You can create a maximum of 10,000 products at a time.
1.Form intruduction
- Upload Template Intruduction
Please click here for the "add a new product" template to view the relevant filling standards and precautions. Other important matters to note are as follows:
1)Name:
- The product name is a required field.
- Name_AR is for the product title in Arabic, and Name_FR is for the product title in French.
- Both are optional fields, but it is recommended that sellers fill them out. Doing so will display the product in the local language on the buyer's page in the corresponding countries, which enhances the buyer experience. If not filled in, the product will be displayed in English in all countries.
Warm reminder: When FBJ account listing products on the Côte d'Ivoire site's , please ensure that product titles are in French. If you use English titles for listing, the platform will provide translation services to translate them into French, with a charge of 1000 FCFA per SKU.
2)Description:
This is a required field.
- Description_AR is for the product description in Arabic, and Description_FR is for the product description in French.
- Both are optional fields, but it is recommended that sellers fill them out. This will display the product in the local language on the buyer's page in the corresponding countries, which enhances the buyer experience.
- Product descriptions should provide consumers with useful information about the product. Please ensure that the descriptions are clear and accurate, and that the content supports HTML code formatting.
3)Seller SKU and Parent SKU: Both are required fields. If a product has multiple variants, the Parent SKU names for the variants must be consistent, and the Seller SKU names must not be duplicated. Example: A blue shirt with different sizes should be filled out as follows (Jumia does not allow color as a variant; if there are shirts in other colors, a separate product must be created for that color).
For example, if you have a blue shirt available in different sizes, you should fill in the information as follows (Jumia does not consider color as a variant, so if you have shirts in other colors, you need to create separate products for each color):
If a product does not have any variants, you can copy the Seller SKU into the Parent SKU field, fill it with "..." to indicate that there are no variations.
Sample:
When filling out product details, avoid using color-related terms such as "white surface with a black base" to reduce the risk of the system interpreting color as a variant.
4)Brand:Brand is a required field, and you can view all available brands in the Brands worksheet.
To sell products under a specific brand, please type the desired brand name into the box and select it from the dropdown menu.
For selling unbranded products:
- For fashion items, enter "1039426-Fashion".
- For all other categories, you can uniformly enter "1045133-Generic".
Please click here to check more details about Brand
a. When applying for a Jumia merchant account, if you register a store name as XXXOfficial store (official store) on the application form, the document review staff will proactively contact you via email to provide the corresponding brand authorization letter to register the brand store. Once the store is successfully registered, the store name cannot be changed.
b.If the brand is already present in the system but is 'Restricted',In this case, sellers need to submit the corresponding brand authorization documents through here to RAC, such as brand registration certificates, official authorization letters, and other relevant materials.
c. If the brand does not yet exist in Vendor center, and you need to create a new brand, please click here to apply (ensure to select the appropriate category below) and provide the corresponding documentation.
5)Primary Category: Please select the product's main category from the dropdown menu. The options available should match the category chosen when downloading the template.
6)Price_USD: The original price of the product in USD, this is a required field.
Sale_Price_USD: The promotional price of the product in USD, this is an optional field. The discount price must not exceed 50%.
Sale Start Date & Sale End Date: The start and end dates for the promotion. If a promotional price is provided, these two dates are required fields.
These prices, calculated in USD, will automatically be converted to the local currency of each site according to the exchange rate.
Note! The date format should be: YYYY-MM-DD HH:mm. Here are the specific steps:
- Stock: Stock is a required field, and the inventory is shared across all sites. Orders from any site will reduce this inventory. The stock will only be visible after passing the quality inspection. If a product has no stock, it will not be visible on the front end. *For overseas warehouse stores (COD) uploading products, please enter a stock quantity of 0. This is because the SKU quantity is based on the actual inventory in Jumia's overseas warehouse. After uploading the product, do not change the stock quantity directly. If you find any errors in the data, please raise a claim in a timely manner.
- product_weight: Weight is a required field and should be in kilograms (KG). If a product weighs 250 grams, you should enter 0.25 here. The product weight entered by the seller is for consumer reference only. The actual international shipping fee calculation weight will be based on the measurement information at the corresponding sorting warehouse.
- Short-description: This is a required field, where AR stands for Arabic and FR stands for French. It is recommended to use HTML code format for the content. Key annotations should be presented in a bullet-point format, with a minimum of 4 points. For 3C electronic products, the key annotations should include at least 7 points, including but not limited to the operating system (OS-Operation System), camera (Came), display, memory (Memory), processor (Processor), battery capacity (Battery), and product color (Colour).
- Image: Product images are a required field, and you can upload up to 8 images. The main image should display the front of the product. The image pixel requirement is between 500x500 and 2000x2000, and the maximum image size should not exceed 2MB. The content to be filled in should be in the format of a URL.
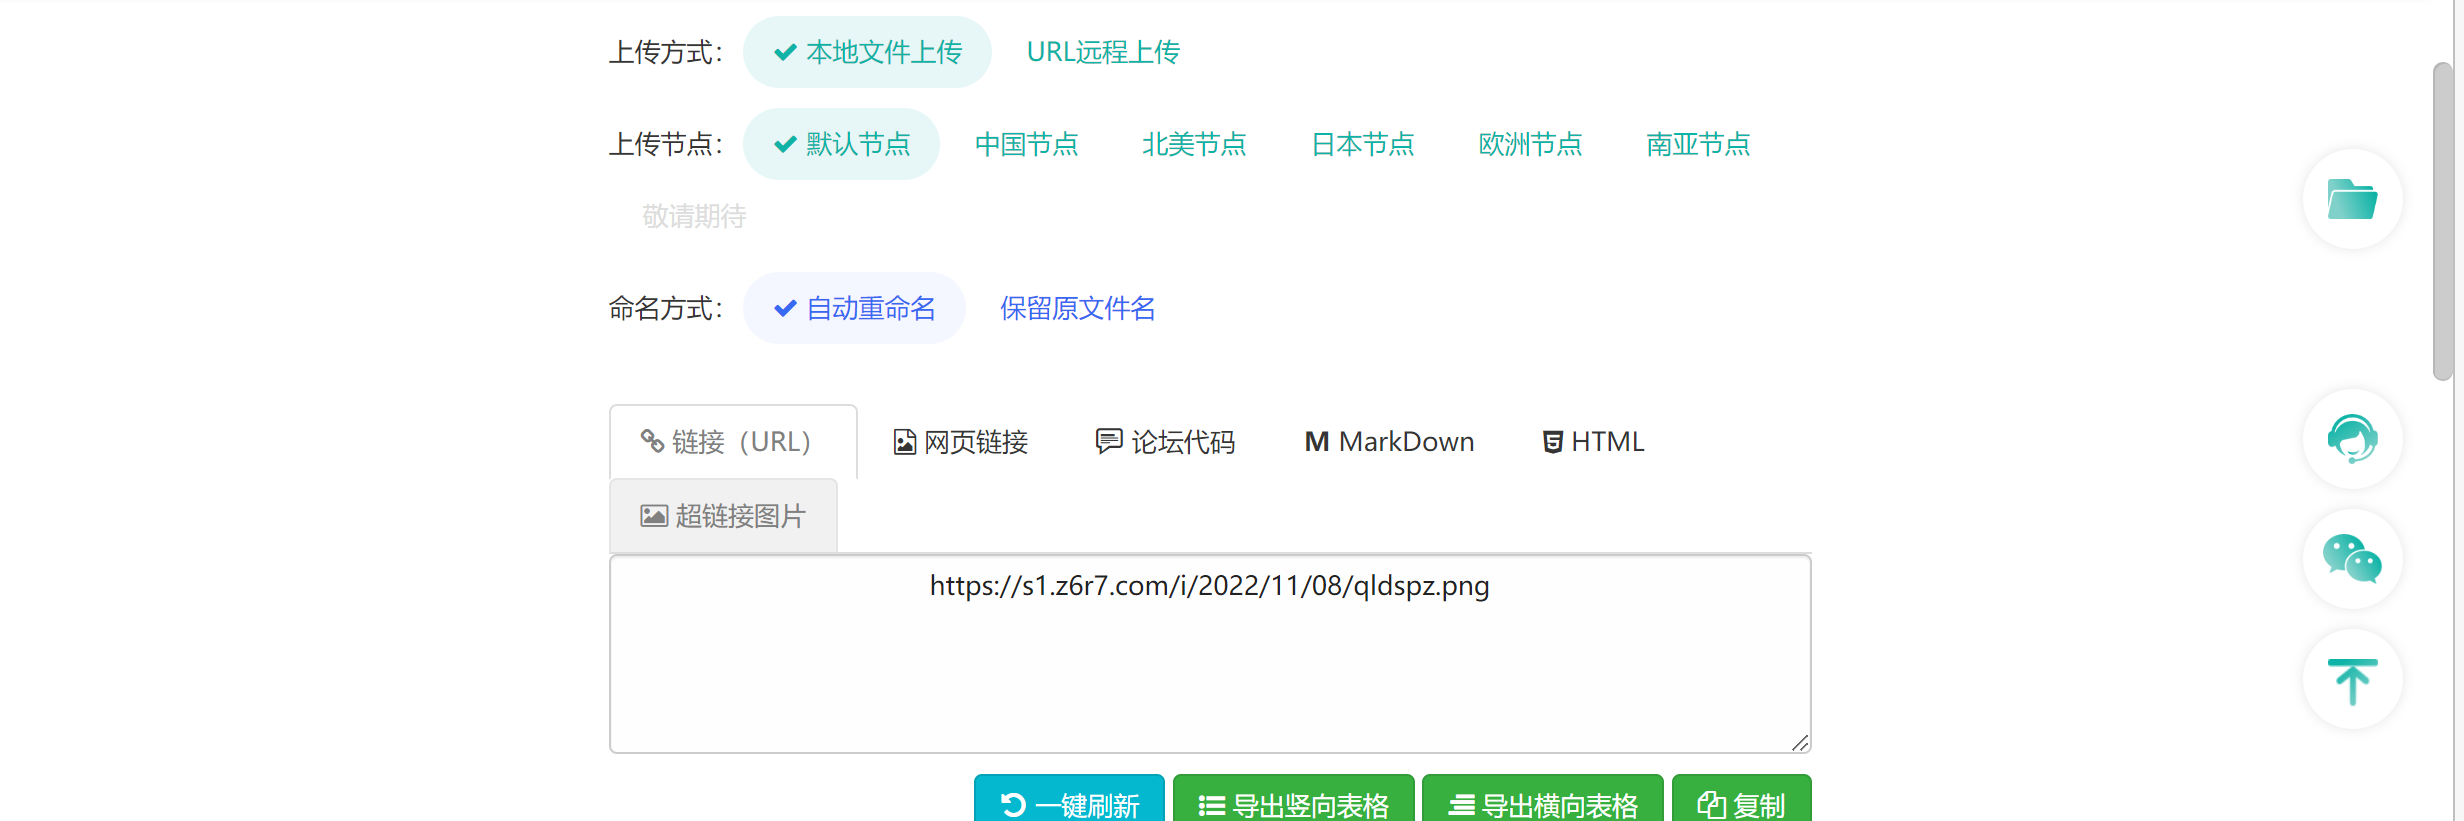
如何上传格式为URL的图片?
How to upload images in URL format?
- Log in to a reputable image hosting service.
- Upload your image to the service.
- After the image is uploaded, select the option to convert the image to "URL" format.
- Copy the URL link provided.
- Paste the URL link into the table where the image URL is required.
11)Other information such as Shop Type, Color Family, and Material Family can be found in the "Options" table where you can select from existing variables using the drop-down menu. For other content, please refer to here for information on filling standards and notes to be aware of.
Step 3:Upload File
- Import the edited spreadsheet, select "Product" for Type, and "Create Products" for Action.
- Choose the store and drag the edited spreadsheet here to upload.
Step 4:Check imprort history
The upload status can be categorized into the following 5 types:
- Pending: Waiting to be uploaded.
- Completed: Finished.
- In progress: Uploading.
- Failed: The upload has failed. Please download the error report to check the reason.
- Partially Failed: Some items did not upload successfully. Click on the progress bar to view the success percentage.
Upload History Page Breakdown:
- Created at: The time when the upload was created.
- User: The person who initiated the upload.
- File: The uploaded file that can be downloaded.
- Action: The category of action performed.
- Status: The current status of the upload; clicking on the status will show the completion progress percentage.
- Progress: Indicates whether the upload is "Finished" or provides an option to download an error report if there are issues.
After successful product creation, the products will enter the product review process.
For more details, you can click here to view the specific content.